We live in strange times. Canada cancelled hockey, Ireland closed its pubs, USA banned baseball. Large gatherings the world over are closed until further notice. People are working from home, afraid to go out.
Toilet paper is a rare commodity.
And it's all because of a novel coronavirus – Covid19 – turning into a global pandemic. We're told social distancing is our best bet to Flatten The Curve and save thousands, maybe millions, of lives.

But how much does social distancing really slow down the spread of Covid19?
I decided to build a simulation and see for myself.
You can watch the full build on YouTube, see the code on Github, and read on for interactive examples of past epidemics.
PS: you can read and share this online, adjust simulation sliders yourself :)
How big an impact does social distancing have?
Not much is known about Covid19 yet. We know it's about 2x as virulent as the flu and 30x as deadly. Each infected person infects 3 others on average (vs. 1.5 for flu).
Estimates range from 3% to 6% mortality rate. The seasonal flu has a mortality rate around 0.1%.
A 3% mortality rate does not mean that 3% of the world will die. It means that if you have corona, you have a 3% chance of death from corona.
For now, many fewer people have gotten Covid19 than the flu. 51,000,000 flu illnesses vs. "just" 174,000 for Covid19. With so far limited testing, numbers are likely to change.
This huge difference in rate of infection is why you see some people saying "Eh way fewer people die than with regular flu".
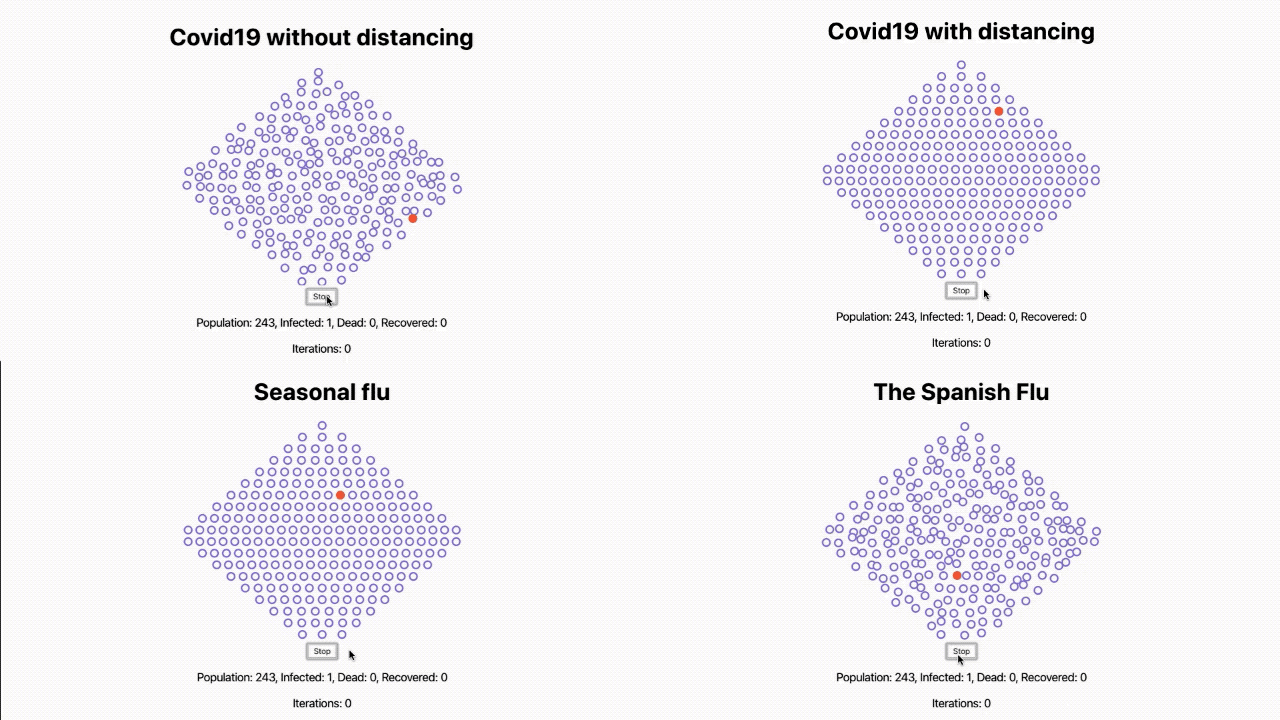
Those people are wrong. Observe how social distancing saves lives 👇

Without social distancing the virus spreads through our population exponentially. Infections and deaths grow like crazy.
But add social distancing and the virus is so contained it barely spreads. A few people get infected, most recover, and that's it. No pandemic.

Try changing the social distancing slider yourself. See how different levels impact the spread of disease.
Here's what the sliders mean:
- Social distancing: limits amount of movement in the population. Between 3px and 0px per iteration.
- Mortality: how likely you are to die during the length of infection. Spread evenly across each iteration for simplicity.
- Virality: how likely you are to get infected after coming into contact with an infectious person. We don't know this data for Covid19 yet as far as I can tell.
- Reinfectability: how much immunity does surviving a virus give you. We know some people have gotten Covid19 twice.
- Length of infection: number of iterations before you recover. This does not directly map to weeks or days, but is useful for comparison between viruses.
Comparing Covid19 with other epidemics
You saw above how Covid19 with social distancing compares to Covid19 without social distancing. But how does it compare to other famous epidemics?
Let's start with the seasonal flu as our baseline.

Everyone gets it, nobody dies.
What about The Black Death?

We know it was deadly, spread fast, and that quarantines were attempted. 30% of Europe died and it took 200 years for the population to recover. yikes
In my simulation it's almost too deadly to spread.
A more recent famous epidemic was The Spanish Flu. Aided by compromised immune systems from the war, it killed millions.

The mortality rate of 4% is similar to Covid19, but a typical influenza lasts just 2 weeks vs. corona's 4 weeks. Far fewer people die as a result. The simulation even reaches herd immunity.
Now let's compare all that to HIV – a virus that's deadly, forever, and surprisingly difficult to get with a virality ranging from 0.04% to 1.4% in a single exposure.

What a huge difference that low virality makes 🤔
How the corona simulation works
If you're curious how this simulation works, here are some of the interesting bits. Watch the full build for details
I'm using the game loop approach to animation from ReactForDataviz. Render a bunch of dots, change their positions, re-render.
This gives us 60fps animation on most machines.
// the logic is contained in a usePopulation React hook// it returns the current population state// some meta data – simulating and iterationCount// and 2 setters – startSimulation, stopSimulationconst {population,startSimulation,stopSimulation,simulating,iterationCount,} = usePopulation({width,height,mortality,virality,socialDistancing,lengthOfInfection,reinfectability,})// ...;<svgstyle={{width,height,}}>{population.map((p) => (<Person {...p} />))}</svg>
Rendering happens in a loop. Go through the population and render each member as a <Person> component.
The <Person> component takes care of colors based on infected, dead, and recovered flags. Renders a circle.
usePopulation
The usePopulation hook creates the initial population, lays it out on the page, and drives the simulation with a d3.timer.
function usePopulation({ ... }) {// initial stateconst [population, setPopulation] = useState(createPopulation({cx: width / 2,cy: height / 2,width: width - 15,height: height - 15}));// controls when the simulation is runningconst [simulating, setSimulating] = useState(false);const [iterationCount, setIterationCount] = useState(0);function startSimulation() {// infect a random personconst person =nextPopulation[Math.floor(Math.random() * nextPopulation.length)];person.infected = 0;// simulation starts when effect from `simulating` runssetPopulation(nextPopulation);setIterationCount(0);setSimulating(true);}function stopSimulation() {setSimulating(false);}// this is the animation loop, d3.timer runs it at 60fpsfunction iteratePopulation(elapsedTime) {const iterationCount = Math.floor(elapsedTime / 60);setPopulation(population => {// calculate the next state of our population on each tick// first, people move aroundnextPopulation = peopleMove(...);// then, some get infected based on collisionsnextPopulation = infectPeople(...);// finally, some die and some recovernextPopulation = peopleDieOrGetBetter(...);return nextPopulation;});setIterationCount(iterationCount);}// runs the simulation loopuseEffect(() => {if (simulating) {const t = d3.timer(iteratePopulation);// stop timer when cleaning upreturn () => t.stop();}}, [simulating]);return { ... };}
I omitted some function arguments to keep the example cleaner. Comments explain the flow.
The interesting parts are collision detection and that initial population layout. Movement just adds random deltas to x and y of each person and infections are just a bunch of if statements.
initial population layout
The initial layout makes heavy use of D3's point scales – d3.scalePoint. They do most of the work for us.
// generates a population oriented around (cx, cy)// fits into width and heightfunction createPopulation({ cx, cy, width, height }) {const Nrows = Math.ceil(height / 15)// translates 0, 1, 2, 3 into evenly spaced Y coordinatesconst yScale = d3.scalePoint().domain(d3.range(0, Nrows)).range([cy - height / 2, cy + height / 2])// this creates the diamond shape by changing the width of each row// linearly going from 0 to full-width back to 0// with some trigonometry, we could make a circleconst widthScale = d3.scaleLinear().domain([0, Nrows / 2, Nrows]).range([15, width, 15])// iterate 0, 1, 2, 3 ... and create rowsconst rows = d3.range(0, Nrows).map((i) => createRow({ cx, cy: yScale(i), width: widthScale(i) }))return rows.reduce((population, row) => [...population, ...row])}
This creates vertically spaced rows that fit into a given height.
Same approach works for each individual row – a point scale spaces members along a given width.
// creates a row of populationfunction createRow({ cx, cy, width }) {// fit as many as possible into a rowconst N = Math.floor(width / 15)// evenly spaces elements along the rowconst xScale = d3.scalePoint().domain(d3.range(0, N)).range([cx - width / 2, cx + width / 2])// iterate and create population members { x, y, key, infected }const row = d3.range(0, N).map((i) => ({x: xScale(i),y: cy,key: hexoid(25)(),infected: null,}))return row}
detecting collisions
The other interesting part is detecting collisions between members of the population. Assuming a virus spreads through direct contact.
A clever use of D3-quadtree lets us avoid comparing every population member with every other member, which would grind our simulation to a halt. That's a O(n^2) algorithm.
A quadtree recursively partitions two-dimensional space into squares, dividing each square into four equally-sized squares. Each distinct point exists in a unique leaf node; coincident points are represented by a linked list.
You get a fast way to search "Is there a node within Width/Height of X, Y?"
So for collision detection you say "Is there a node within Size of This Node?". If there is, you have a collision.
// when people collide, they transfer virusesfunction peopleCollisions(population) {// we only care about infected peopleconst infected = population.filter((p) => p.infected !== null)// find people in vicinity of infected peopleconst collisions = infected.map((person) => {// subdivides whole space to find nearest candidatesconst subdvidedSpace = d3.quadtree().extent([[-1, -1],[RADIUS * 2, RADIUS * 2],]).x((d) => d.x).y((d) => d.y).addAll(// everyone not infected and not current lookuppopulation.filter((p) => !p.infected).filter((p) => p.key !== person.key))// person within RADIUS*2 of lookup positionconst candidate = subdvidedSpace.find(person.x, person.y, RADIUS * 2)return candidate ? candidate : null})// everyone who collided with an infected personreturn collisions.filter((p) => p !== null)}
Once you have the list of collisions, you go through them, calculate probability they got infected, and change their state.
✌️
In conclusion
Social distancing works, simulating viral spread is fun, and combining React with D3 is powerful as heck.
Consider sharing this with friends :)
Social distancing schmistancing. How big a difference on #CoronavirusOutbreak can it really make?
— Swizec Teller (@Swizec) March 16, 2020
Wanted to see for myself so I built this simulation. Adjust sliders, see how factors affect a pandemic. 🤔
enjoy and share ❤️
details and playgrounds 👉 https://t.co/s9fq1QWMVk pic.twitter.com/pdhzv0cJyc
Cheers,
~Swizec
About the Author

Hi, I’m Swizec Teller. I help coders become software engineers.
Story time 👇
React+D3 started as a bet in April 2015. A friend wanted to learn React and challenged me to publish a book. A month later React+D3 launched with 79 pages of hard earned knowledge.
In April 2016 it became React+D3 ES6. 117 pages and growing beyond a single big project it was a huge success. I kept going, started live streaming, and publishing videos on YouTube.
In 2017, after 10 months of work, React + D3v4 became the best book I'd ever written. At 249 pages, many examples, and code to play with it was designed like a step-by-step course. But I felt something was missing.
So in late 2018 I rebuilt the entire thing as React for Data Visualization — a proper video course. Designed for busy people with real lives like you. Over 8 hours of video material, split into chunks no longer than 5 minutes, a bunch of new chapters, and techniques I discovered along the way.
React for Data Visualization is the best way to learn how to build scalable dataviz components your whole team can understand.
Some of my work has been featured in 👇