Have you ever tried making a sankey diagram with d3+react, I can't seem to make it work for some reason.:/
~Emil
No Emil, I have not. Let's give it a shot! Thanks for finding us a dataset that fits :)
Dataset: Download dataset 🗳My solution 👇
What is a Sankey diagram?
Sankey diagrams are flow diagrams. They're often used to show flows of money and other resources between different parts of an organization. Or between different organizations. Sankey originally designed them to show energy flows in factories.
Vertical rectangles represent nodes in the flow, lines connecting the rectangles show how each node contributes to the inputs of the next node. Line thickness correlates to flow magnitude.
One of the most famous Sankey diagrams in history is this visualization of Napoleon's invasion into Russia.
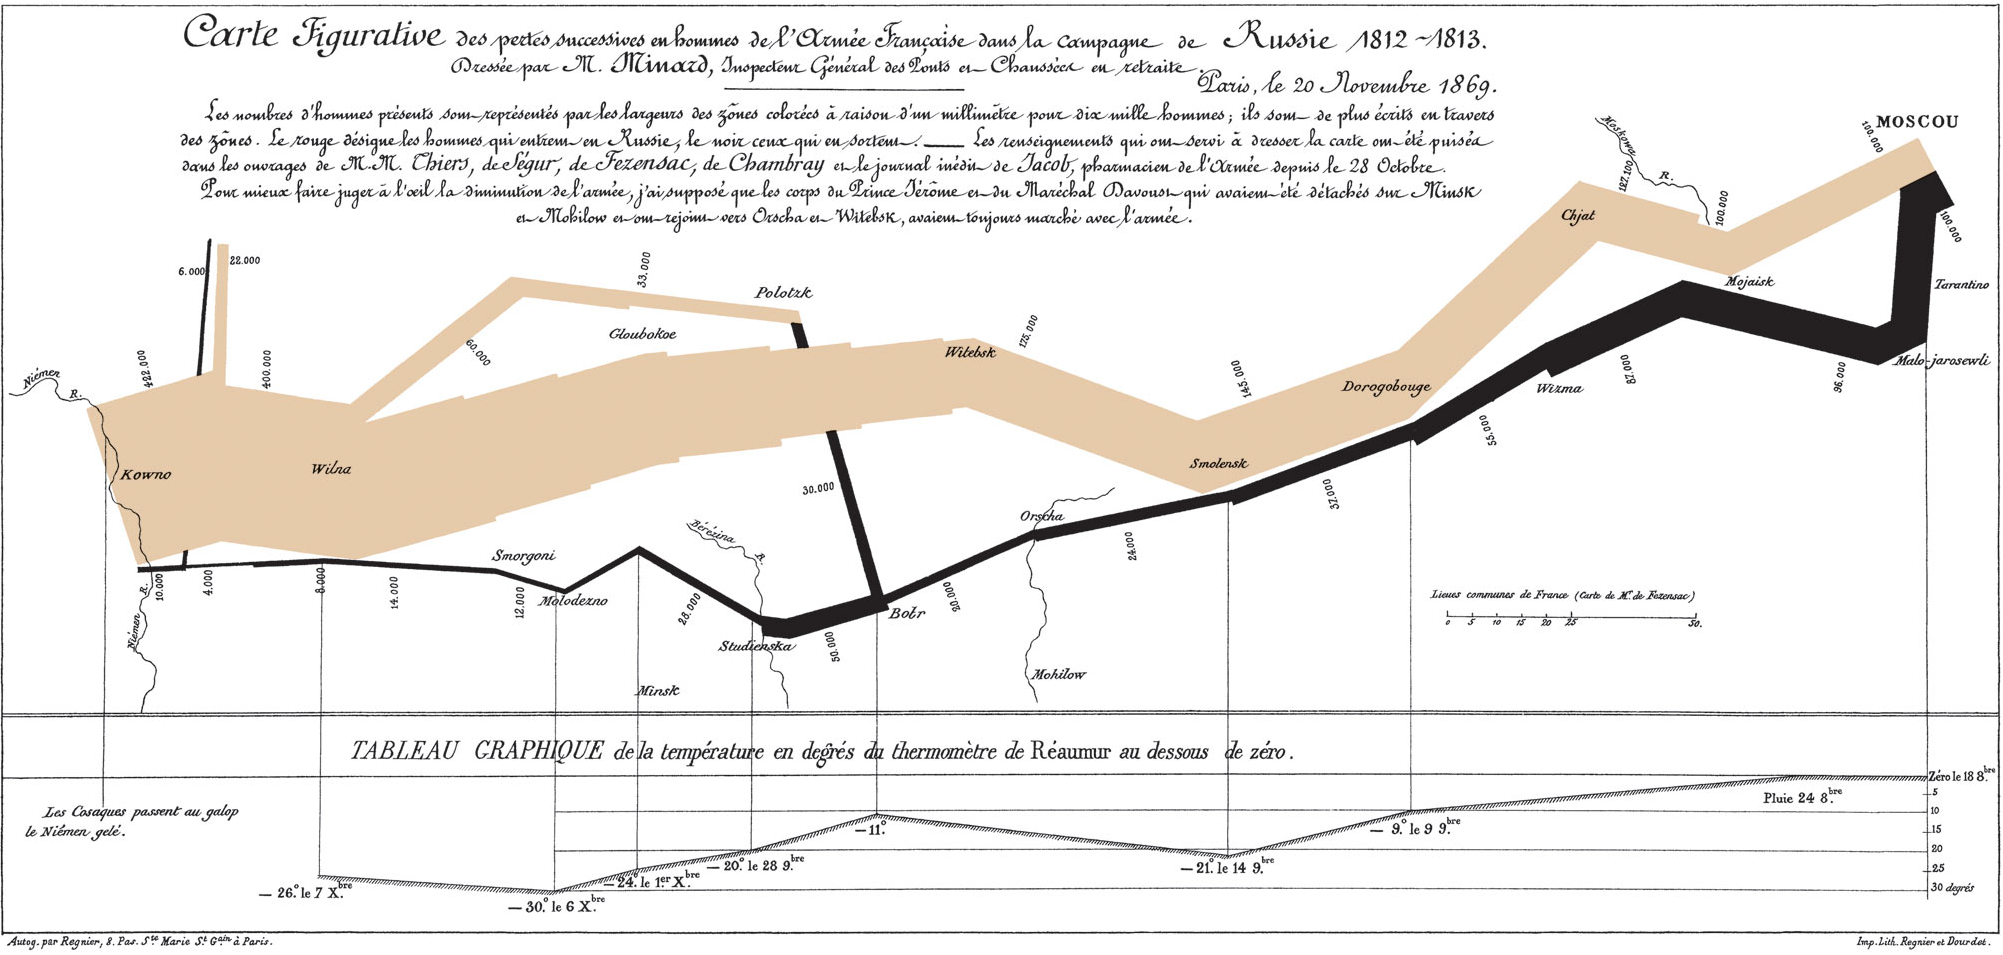
No I'm not quite sure how to read that either. But it's cool and it's old ✌️
How do you make a sankey with React and D3?
Turns out building a Sankey diagram with React and D3 isn't terribly difficult. A D3 extension library called d3-sankey provides a generator for them. Your job is to fill it with data, then render.
The dataset Emil found for us was specifically designed for Sankey diagrams so that was awesome. Thanks Emil. 🙏🏻
I don't know what our data represents, but you gotta wrangle yours into nodes and links.
nodesare an array of representative keys, names in our caselinksare an array of objects mapping asourceindex to atargetindex with a numericvalue
{"nodes": [{"name": "Universidad de Granada"},{"name": "De Comunidades Autónomas"},//...],"links": [{"source": 19,"target": 26,"value": 1150000},{"source": 0,"target": 19,"value": 283175993},//...}
Turn data into a Sankey layout
We can keep things simple with a functional component that calculates the Sankey layout on the fly with every render. We'll need some color stuff too. That was actually the hardest, lol.
import { sankey, sankeyLinkHorizontal } from "d3-sankey";//...const MysteriousSankey = ({ data, width, height }) => {const { nodes, links } = sankey().nodeWidth(15).nodePadding(10).extent([[1, 1], [width - 1, height - 5]])(data);const color = chroma.scale("Set3").classes(nodes.length);const colorScale = d3.scaleLinear().domain([0, nodes.length]).range([0, 1]);
It's called MysteriousSankey because I don't know what our dataset represents. Takes a width, a height, and a data prop.
We get the sankey generator from d3-sankey, initialize a new generator with sankey(), define a width for our nodes and give them some vertical padding. Extent defines the size of our diagram with 2 coordinates: the top left and bottom right corner.
Colors are a little trickier. We use chroma to define a color scale based on the predefined Set3 brewer category. We split it up into nodes.length worth of colors - one for each node. But this expects inputs like 0.01, 0.1 etc.
To make that easier we define a colorScale as well. It takes indexes of our nodes and translates them into those 0 to 1 numbers. Feed that into the color thingy and it returns a color for each node.
Render your Sankey
A good approach to render your Sankey diagram is using two components:
<SankeyNode>for each node<SankeyLink>for each link between them
You use them in two loops in the main <MysteriousSankey> component.
return (<g style={{ mixBlendMode: "multiply" }}>{nodes.map((node, i) => (<SankeyNode{...node}color={color(colorScale(i)).hex()}key={node.name}/>))}{links.map((link, i) => (<SankeyLinklink={link}color={color(colorScale(link.source.index)).hex()}/>))}</g>)
Here you can see a case of inconsistent API design. SankeyNode gets node data splatted into props, SankeyLink prefers a single prop for all the link info. There's a reason for that and you might want to keep to the same approach in both anyway.
Both also get a color prop with the messiness of translating a node index into a [0, 1] number passed into the chroma color scale, translated into a hex string. Mess.
<SankeyNode>
const SankeyNode = ({ name, x0, x1, y0, y1, color }) => (<rect x={x0} y={y0} width={x1 - x0} height={y1 - y0} fill={color}><title>{name}</title></rect>)
SankeyNodes are rectangles with a title. We take top left and bottom right coordinates from the sankey generator and feed them into rect SVG elements. Color comes form the color prop.
<SankeyLink>
const SankeyLink = ({ link, color }) => (<pathd={sankeyLinkHorizontal()(link)}style={{fill: "none",strokeOpacity: ".3",stroke: color,strokeWidth: Math.max(1, link.width),}}/>)
SankeyLinks are paths. We initialze a sankeyLinkHorizontal path generator instance, feed it link info and that creates the path shape for us. This is why it was easier to get everything in a single link prop. No idea which arguments the generator actually uses.
Styling is tricky too.
Sankey links are lines. They don't look like lines, but that's what they are. You want to make sure fill is set to nothing, and use strokeWidth to get that nice volume going.
The rest is just colors and opacities to make it look prettier.
A sankey diagram comes out 👇

You can make it betterer with some interaction on the nodes or even links. They're components so the world is your oyster. Anything you can do with components, you can do with these.
About the Author

Hi, I’m Swizec Teller. I help coders become software engineers.
Story time 👇
React+D3 started as a bet in April 2015. A friend wanted to learn React and challenged me to publish a book. A month later React+D3 launched with 79 pages of hard earned knowledge.
In April 2016 it became React+D3 ES6. 117 pages and growing beyond a single big project it was a huge success. I kept going, started live streaming, and publishing videos on YouTube.
In 2017, after 10 months of work, React + D3v4 became the best book I'd ever written. At 249 pages, many examples, and code to play with it was designed like a step-by-step course. But I felt something was missing.
So in late 2018 I rebuilt the entire thing as React for Data Visualization — a proper video course. Designed for busy people with real lives like you. Over 8 hours of video material, split into chunks no longer than 5 minutes, a bunch of new chapters, and techniques I discovered along the way.
React for Data Visualization is the best way to learn how to build scalable dataviz components your whole team can understand.
Some of my work has been featured in 👇